Showing posts with label wood engraving. Show all posts

Wednesday, August 29, 2018

Done! Tips for engraving and printmaking with Corian blocks

Corian

Corian is actually the name of a synthetic resin by Dupont that is used for kitchen counter-tops and other fixtures. Another use for Corian is as cutting boards. So once upon a time, I thought to use it as an engraving surface although I was not surely the first.

Corian scraps are easily acquired through EBay and other online outlets, as well as any kitchen/bathroom counter manufacturer or kitchen remodeler in your area. If lucky, a kitchen depot place will let you rummage through their discards and you can get this marvel substance for free. Even when purchased online it is not very expensive, especially when compared with traditional end-grain wood engraving blocks, and especially for larger blocks.
Seeds are sown...
engraving on Corian
Also example of heavily textured
Corian block

Cutting and Working Corian

Amazingly, Corian is very easy to cut with a proper saw blade and will easily cut even by hand with a diamond or carbide blade. I prefer carbide blades on my jigsaw although for many cuts a circular saw or even table saw may be appropriate. The cuts are clean without chipping with a sharp blade and some patience, let the blade do the work rather than pushing it.
Crossing Paths, a large engraving on Corian
Detail

Preparing Corian blocks

Little is needed to get Corian ready to engrave. I like to give the surface a careful look because any tiny scratch will show on delicate prints. The surface can almost always use a bit of degreasing, like etching plates, because they come with a slightly waxy feel so that they will repel substances in kitchen use. 
I usually degrease with kitchen detergent and a soft plastic bristle brush. Then it will accept a drawing or transfer. Cleaning the blocks is very easy, I clean by printing and they give up the ink so easily that very little else is needed. I usually wipe with a dry shop towel and sometimes give it a last cleaning with alcohol.

Transfer or drawing

I have successfully transferred inkjet drawings onto the surface with various methods, my favorite is "Studio Paper" from McClain's (imcclains.com). Unfortunately, most Corian scraps are colored to resemble granite or other surfaces and sometimes heavily so. The upshot is that a generous going-over with magic marker is almost always necessary. The drawing with marker will eventually wear off after a few proofings and cleanings so be aware of that.
Advantage of drawing with marker is that the blocks don't need hardly any preparation at all. Just reverse your reference drawing and copy onto block.

Detail! oh my...

Datura, on end-grain lemon wood block

The main advantage of Corian is the amazing detail that is possible. I engrave mostly with standard wood engraving tools and only need to hone them slightly during work. Perhaps the biggest advantage of Corian is that it will accept limitless rotary tool marks without chipping, breaking down or disintegrating as sometimes wood and Resingrave are prone to do.

The tiniest details are possible so Corian has become my favorite surface for smaller works. A vast landscape on a tiny block has a wonderful miniature masterpiece feel to it. Don't forget to get good magnifying equipment and good light. I use a combination magnifier/lamp which makes working detail very easy. 

Printing is much easier than with wood as there is no absorbance of ink into the block. Very little ink is needed and spread very well but in a thin layer. When Corian meets paper nearly all the ink gets transferred with not so much pressure so printing smaller works by hand is fast work.
The latest, still drying on the rack
Not too far to walk, size is 10 x 15 inches
block slightly smaller


Stay in touch!

1000woodcuts Facebook Page: https://www.facebook.com/1000woodcuts 
Maria's Facebook Profile: https://www.facebook.com/maria.arango.diener 
Maria's Twitter Profile: https://twitter.com/1000woodcuts 
1000woodcuts YouTube: https://www.youtube.com/user/1000woodcuts/videos

Wednesday, August 22, 2018

Still working, another engraving on Corian

Not too far to walk

I'm into detail nowadays, makes me disciplined and I enjoy the magic of bringing something out of nothing with tiny little marks...LOTS of tiny little marks. Corian is perfect for that.
Since Corian scraps are often colored and sometimes heavily so, I have been using spray gesso (which BTW auto-correct wants to change to "gestapo" LOL). A nice thin layer of gesso and my drawings or transfers go on perfectly. Unfortunately as I engrave, the dark color of the Corian slab comes through but under the magnifying lamp, I can see all the lines like little canyons in the desert.
This particular block is a medium gray so once I inked and cleaned up, the elements show up nicely.

And speaking of desert, here is my latest, I'm on the third proof and still a bit of cleaning up and tidying up to do:

Block, proof 1, just defined the elements

Block, proof 2, light starts to appear


Print proof 3, getting there!
Some details to bring out,
more light in the background,
few areas to "correct"


I was going to call this piece "promised land" but being a realist I understand there is no such thing in life. All we have is our respective journeys and our feet. Once the walk begins, there is no place that is too far to walk if we just have the stubborn inclination to keep walking. The light guides us, surrounded aloft and afoot by prickly, sharp, hard and biting things, we bear all, we move onward to the destination, distant yet attainable and somehow irrelevant. Walking the journey is life, one step at a time. 
"Not too far to walk" is a a song by John Huling, largely unknown master flutist who publishes most inspiring native nature revering Southwest music.


Stay in touch!

1000woodcuts Facebook Page: https://www.facebook.com/1000woodcuts 
Maria's Facebook Profile: https://www.facebook.com/maria.arango.diener 
Maria's Twitter Profile: https://twitter.com/1000woodcuts 
1000woodcuts YouTube: https://www.youtube.com/user/1000woodcuts/videos

Monday, July 10, 2017

Proofing...and back to the carving board!

Proofing

Never was much of a "proofer" until I started wood engraving, Corian engraving included. In standard woodcuts I tint the block and carve away and basically what you see is what you get with some little details having to be tweaked here and there.
When engraving, however, it is increasingly difficult to tell what a block will print like. Hopefully, I have trained myself to carve darker than I want the end print to be. If it is lighter, that means too much has been carved and...well, I'm stuck with it!

The block carved at last! Or maybe not,
three close ups follow
Age brings patience in art, I think. So here are the first proofs and a bunch of stuff to clean up, lighten up, brighten up, enhance and so on. As usual, I printed the last proof on clear mylar so that I can reverse and have an exact copy of my block; if you have been paying attention (ha!), you know what I mean. If not, dig through my blog and search for tricks and tips.

Proofs were pulled with my ball bearing baren (say that three times fast), which is an awesome tool with huge power to pull prints by hand. Takes almost no pressure, stays very flat, does not rip the paper and makes a nice whirl whirl sound as it pulls a print ("it" pulls a print driven my hand, that is). Corian gives up the ink very easily so very little is needed to get nice blacks and lots of detail, I'm using Gamblin black.

Back to carving, sky needs cleaning up, areas need light, road needs work, trees need detail, river needs cleaning...back to the carving board!


Proofs get darker and darker,
patience is key to good blacks without
gumming up the fine details

The proof on Mylar, gets reversed to mimic the block

Proof on newsprint (always so warm and cozy)
and the Mylar reversed

The block after cleanup, never again will it look
so beautiful as after the first carving..sigh


Stay in touch!

1000woodcuts Facebook Page: https://www.facebook.com/1000woodcuts 
Maria's Facebook Profile: https://www.facebook.com/maria.arango.diener 
Maria's Twitter Profile: https://twitter.com/1000woodcuts 
1000woodcuts YouTube: https://www.youtube.com/user/1000woodcuts/videos

Wednesday, June 21, 2017

A Road, A River and a Railroad Track

Travel Thoughts

I travel a bit and have even more so in the past. Not long ago I was participating in near 24 festivals a year, almost one every other week. Some trips I would leave home, attend two festivals in a row with a glorious camping week in between, and return two weeks later tired and happy.

In Utah under the rain
I love roads, every road, mountain roads, desert roads, dirt trails, highways...fascinating network of ribbons that magically transport my faithful truck from my driveway to a far destination. I rarely listen to music but prefer to let the road permeate me and fill me with all the passing beauty, desolation, open skies, forests, meadows, rivers and railroad tracks.
The River


Indeed many roads in the West crisscross paths with rivers and railroad tracks, again and again. On a recent trip to Utah I entered a canyon and counted the number of times the river and the railroad track cross under the road or the road went above the tracks. I forget and instead remember the bridges, the tunnels, the dams and waterfalls, the boiling river and the steady train...and me in my truck on the road.
Road at sunrise

Struck me that people and life are just like that: a road, a river and a railroad track. Sometimes we travel comfortable and predictably along straight tracks and safe tunnels; sometimes we take an unknown road, knowing that it was built and must begin and end somewhere; yet others we ride the rivers, unpredictable and a bit dangerous...just enough.

So it was destiny that I would make art about it. I may make more than one piece because there is so much to remember. This first piece starts out as a simple depiction of just the theme, a road, a river and a railroad track. Next time you travel, watch for them to come together and disappear apart in the distance, only to come together again, over, under...


First Sketch for A Road, A River and a Railroad Track

Road, River and Railroad


Stay in touch!

1000woodcuts Facebook Page: https://www.facebook.com/1000woodcuts 
Maria's Facebook Profile: https://www.facebook.com/maria.arango.diener 
Maria's Twitter Profile: https://twitter.com/1000woodcuts 
1000woodcuts YouTube: https://www.youtube.com/user/1000woodcuts/videos

Friday, April 7, 2017

Advancing on Two Fronts, Must Be Spring!

Energy! Two Studio Tricks

I love it when I'm full of energy...mostly because some (other) times I have to "make" myself work, ups and downs, you know...
Anyhow, I am fully enjoying a flurry of self-inflicted activity, and making progress on a long project and a short-ish project.

The Long: Ghost Town

About a week ago I finished carving not only the 20 small woodcuts for the Ghost Town project but also a medium size View block. The 20 4x6 inch blocks are ready to print and so I started mulling how to make a big project not so big. Turns out, a sheet of 22x30 inch paper will print 9 at a time with generous margins.
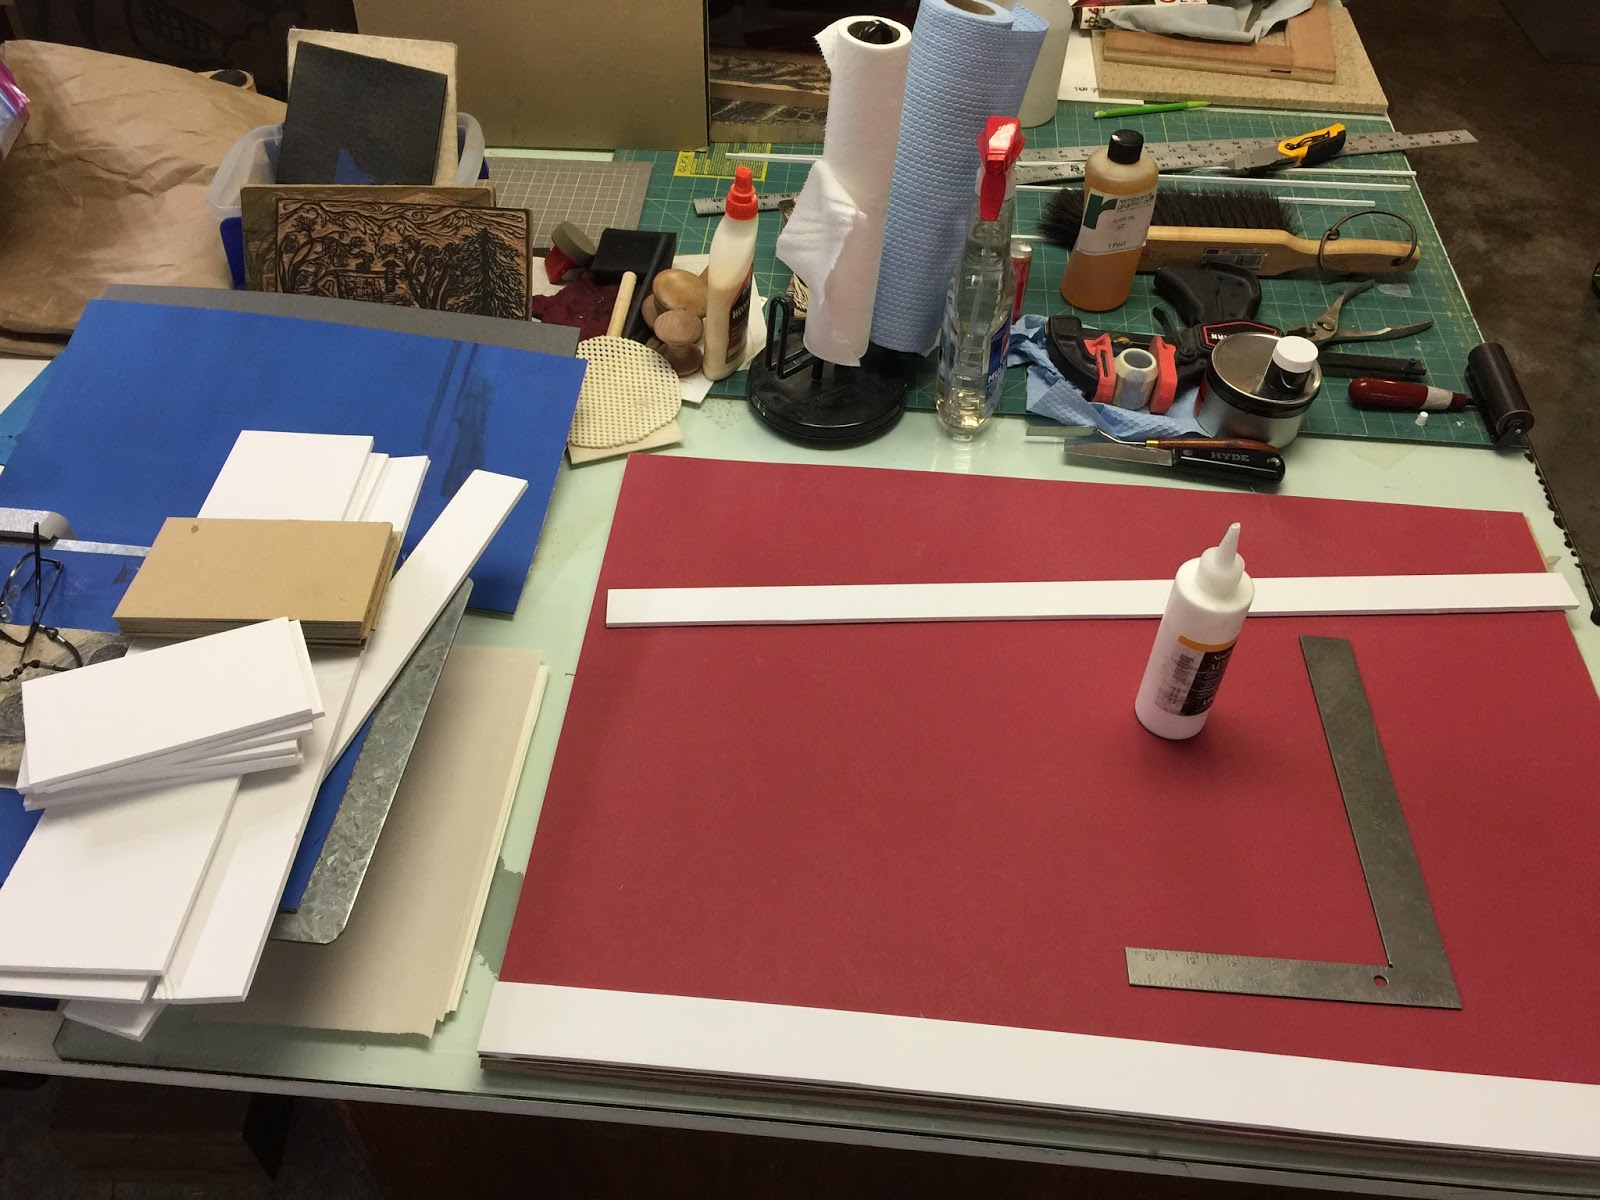
I have printed multiple blocks before, all this trick necessitates is a "jig" that holds the blocks in place while a large sheet of paper is placed on a few blocks simultaneously. The "lock" (in letterpress called a chase) has to be slightly lower than the blocks so that I can ink away without removing the blocks each print. I construct these from foam-board, mat-board and/or gator-board, whatever thickness combination gives me the ideal height to hold the blocks in place just above the jig surface.
Here are pictures, better than descriptions!
First laying out the blocks and finding the spacing

Some calculations on the sizes of spacers needed
(I'm good at math!)
Spacers cut on left, glue and square ready

I place the blocks as I go to make sure they fit

Each block held at the right height by gator-board

Presto! The completed chase, blocks in place
Ink and paper required, After the blocks are printed
I can trim the paper to size

The Short: Wings Exchange, the Flying Maple Seeds

Also made the final adjustments on the Seeds are Sown, Life is Grown print for the Barenforum.org 72nd print exchange. I will detail the complete process in next post, but here are the photos and the video:


First vs second proofs

block and print

Last few details and cleaning up
require my magnifying lamp

Detail of my tiniest tool doing some
delicate carving

Stay in touch!

1000woodcuts Facebook Page: https://www.facebook.com/1000woodcuts 
Maria's Facebook Profile: https://www.facebook.com/maria.arango.diener 
Maria's Twitter Profile: https://twitter.com/1000woodcuts 
1000woodcuts YouTube: https://www.youtube.com/user/1000woodcuts/videos

Wednesday, February 15, 2017

Wood Engraving for Fun and Profit...well, fun anyway!

Little works

My friends at the Wood Engraver's Network have been exchanging prints for as long as I can remember. Upon renewing my membership this year, I decided to contribute something, which I have not done in a while. I produced in the past a couple of Bundle newsletter covers (bundles are what the twice yearly exchanges are called) and I recently received a nice check from their traveling exhibit and sale of my contributions. All and all this is a neat group of humble and masterful printmakers and I am proud to be a member. 

For my non-artist friends, wood engravings are like woodcuts but done on much harder wood or other surface and "engraved" (rather than "carved") with metal engraving tools much like jewelers use to engrave metal. As a result of the tedious process, wood engravings tend to be much more detailed than woodcuts and the illusion of "shading" is often possible by using very fine lines.
"Out Early" engraving on end-grain maple, 5 x 7 inches (11 x 15.5 cm)
Detail of "Out Early" printed with copper/umber inks

Here is Datura, a new wood engraving of a poisonous plant that lives in the desert lands and produces spectacular and very large white flowers surrounded by deep green leaves. I engraved it in lemonwood (end-grain) purchased from Dab Hand Print on Ebay.
This tiny print is about 1.25 x 2 inches (3 x 4.5cm), barely! The glasses pictured have a magnification of +3.0.
First proofs done, a little tweaking and cleaning up is in order, then I begin printing.

Tiny Datura on my home-made leather bag,
traditionally used to hold engraving blocks in place.
The two tools pictured are a #3 angle tint and
a #1 spit-sticker from Ramelson

close up of almost done block

Another good thing about engravings...
the mess is so small!
I proof with home-made wooden door-knob tools

First proof

More proofing, need to do some clean up
but it's looking good
 

Stay in touch!

1000woodcuts Facebook Page: https://www.facebook.com/1000woodcuts 
Maria's Facebook Profile: https://www.facebook.com/maria.arango.diener 
Maria's Twitter Profile: https://twitter.com/1000woodcuts 
1000woodcuts YouTube: https://www.youtube.com/user/1000woodcuts/videos

Thursday, February 2, 2017

Two New Works

Still of the Night

This is a pretty standard "wood" engraving, carved on Resingrave from McClain's Printmaking Supply http://www.imcclains.com/. Wood engravings in black and white are solely dependent on light in order to achieve a successful image. My own approach is to sketch with pencil first, then a thin permanent marker (Sharpie). Once I have all the shapes blocked in black marker, I proceed with the engraving. 
I use standard burins, gravers and such and on occasion take up a rotary tool with a very thin bit in order to achieve some random marks. Nearly all the disciplined line work done with a standard engraving tool, nearly all the squiggly stuff done with rotary tool.
I don't tend to proof when doing woodcuts but do use proofing when engraving. I also "ink" the block as I engrave with a thick marker and a very light touch to get an idea where the light and dark are going. I feel the light is very vibrant and always in motion and I think this engraving reflects that (ironically, despite the name: Still of the Night!).
The engraving depicts Omen, a stray cat who frequented our outside feeders for about 6 months. I learned her name, when, ironically again, Omen was struck down by a vehicle days after I finished the engraving.
Still of the Night
wood engraving, 3 x 6 inches


Old Cabin

About 3 years ago we purchased an old cabin built in 1972 that had been sitting unwanted for over 20 years. More than an old cabin, it has become a refuge, an ongoing project, a learning experience, a getaway, a delightful never ending occupation and ever present peaceful and quiet place. More irony, we said: "let's not get something that's a lot of work!"

The print is leading toward my new body of work as will be seen in a future post. This "guide" print is done with two cherry blocks. The key block carries all the information and the single color block is printed in two "rainbow" rolls, as shown in the ink slab picture. In this manner I can get all the color in one pass, in typical efficient-Maria-fashion.

I used hand-made banana bark paper, which was hand-torn rather than cut and printed damp. This poses a slight potential registration problem, so I run my fingernail along the registration guides to score the paper. The fibers of the paper have "memory" and retain the slight score, even as the paper was redampened for over printing the key block. Here is the process in images:


Print Title: Old Cabin
Paper Dimension: 7.5 x 10 inches
Image Dimension: 7 x 9 inches
Block: Cherrywood
Pigment or Ink: Charbonnel Aqua Wash
Paper: Banana bark handmade
Edition: 60


Stay in touch!

1000woodcuts Facebook Page: https://www.facebook.com/1000woodcuts 
Maria's Facebook Profile: https://www.facebook.com/maria.arango.diener 
Maria's Twitter Profile: https://twitter.com/1000woodcuts 
1000woodcuts YouTube: https://www.youtube.com/user/1000woodcuts/videos